[EN] - Creating a cluster with CoreOS and Docker
26/01/2015
Continuing my studies about CoreOS, in this post I will configure a cluster on Amazon EC2 and then I’ll start a Docker service in this cluster.
The cluster
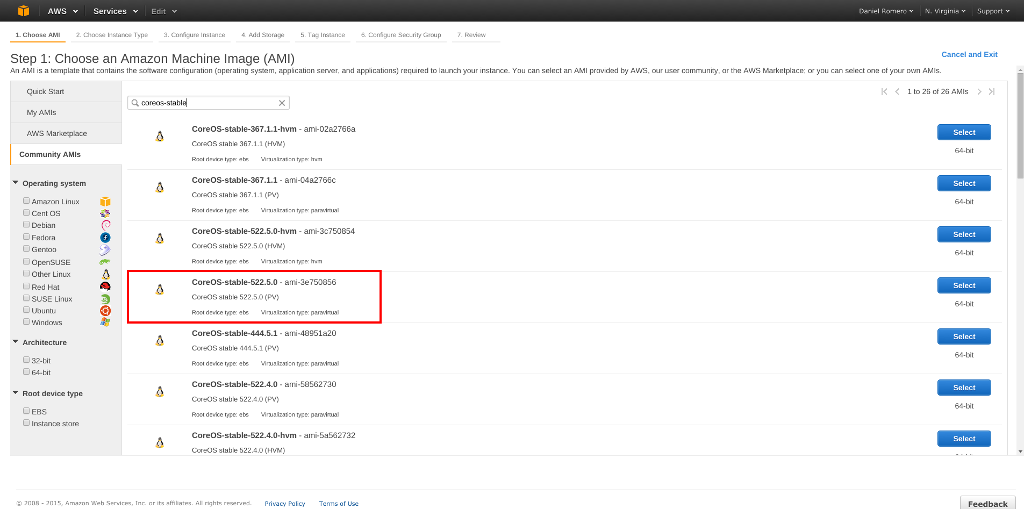
The first thing I did was create two instances EC2 using CoreOS, for
this I used the stable image ami-3e750856 containing one of the
latest versions of CoreOS and Docker:
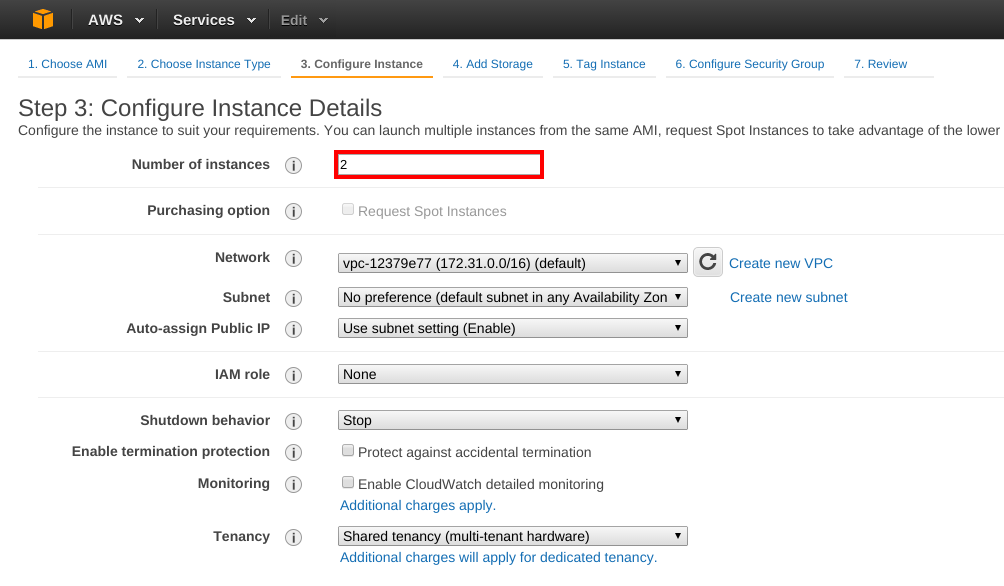
Then I configured the number of instances that I wanted to create:
To create the cluster, we need to store the CoreOS nodes’ addresses
and metadata, to make it easily we can use the Etcd as seen in the
previous post.
To use it, simply generate a new token accessing the url: https://discovery.etcd.io/new.
Also in the configuration panel, we have to customize the startup of
new instances, configuring network details, Etcd discoveries service
and Fleet cluster manager.
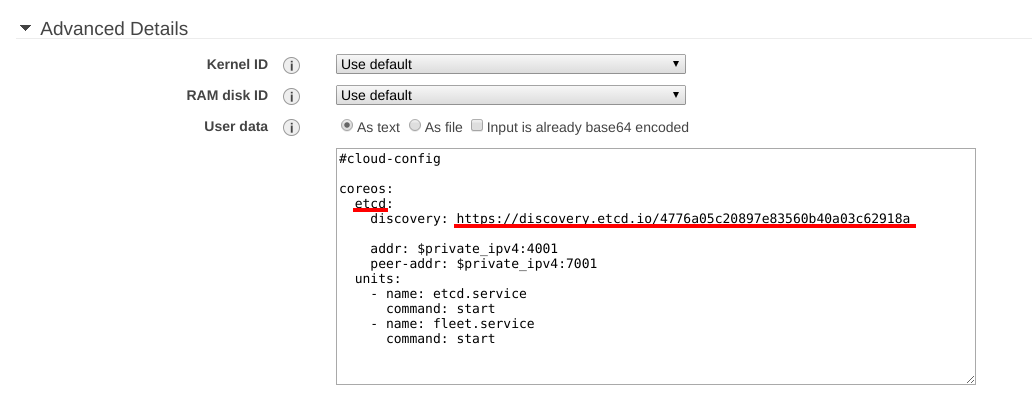
We can create our cloud-config file that is written to the YAML format.
This file is processed during startup of the cluster’s machines, the
minimum configuration would be this:
#cloud-config

coreos:
  etcd:
    # generate a new token from https://discovery.etcd.io/new
    discovery: https://discovery.etcd.io/4776a05c20897e83560b40a03c62918a

    # multi-region and multi-cloud deployments need to use $public_ipv4
    addr: $private_ipv4:4001
    peer-addr: $private_ipv4:7001
  units:
    - name: etcd.service
      command: start
    - name: fleet.service
      command: start
The cloud-config settings can be entered in the User data option as
text:
After finishing the configuration and creation of instances, we can test
the cluster accessing any node and the fleetctl utility request that
it lists all the machines included in the cluster:
$ ssh core@54.174.248.174

CoreOS (stable)
core@ip-172-31-34-98 ~ $ fleetctl list-machines

MACHINE		  IP			  METADATA
610aa9e3...	  172.31.34.98    -
0b735501...	  172.31.34.97    -
The cluster is configured correctly, because the commandand’s output returned the two machines that were created.
Creating a Service
By default the CoreOS comes with Docker. For this example I will create a Nginx container starting from an image that I maintain:
core@ip-172-31-34-98 ~ $ docker run -d -p 80:80 infoslack/docker-nginx
Unable to find image 'infoslack/docker-nginx' locally
Pulling repository infoslack/docker-nginx
76002e20f9ce: Pulling image (latest) from infoslack...: Download complete
511136ea3c5a: Download complete
c7b7c6419568: Download complete
70c8faa62a44: Download complete
...
Status: Downloaded newer image for infoslack/docker-nginx:latest
b1fb3d2a3995f92a9ad8b5c623315c23d5822da58f6481c39f3be0bcab2727ea
Now that we have a container running Nginx, we can build our unit-files,
for this we will use Fleet to schedule the update of each services
throughout the cluster, functioning as a centralized control interface
that handles the systemd of each cluster node.
We can start by creating the first unit-file nginx@.service, the
@ in the file description states that it is only a model:
[Unit]
Description=Nginx web server service
After=etcd.service
After=docker.service
Requires=nginx-discovery@%i.service

[Service]
TimeoutStartSec=0
KillMode=none
ExecStartPre=-/usr/bin/docker kill nginx%i
ExecStartPre=-/usr/bin/docker rm nginx%i
ExecStartPre=/usr/bin/docker pull infoslack/docker-nginx
ExecStart=/usr/bin/docker run -d --name nginx%i -p 80:80 infoslack/docker-nginx

[X-Fleet]
X-Conflicts=nginx@*.service
Analyzing by parts, we have a section header represented by [Unit]
and then some metadata about the unity created. In Description we
insert the service description and the After clausules check the
dependencies, in this case we are checking if the Etcd and Docker
services are available before running the next lines.
Another services file is added through the Requires, adding in this
case nginx-discovery@%i.service, a file responsible for updating the
Etcd with informations about our Docker service. The suffix % i
are variables to receive parameters that will be sent by Fleet.
Then we need to tell which services should be loaded, this is done in
the [Service] section. We will control Docker containers, but first we
need to disable the timeout service, because during the initial startup
of the container on each cluster node, it will take a longer time than
the default. To control the actions of Start and Stop in our
service, we need to tell Systemd that we want to have control, then
set the mode KillMode for none.
Before the service be initialized, we need to make sure that the
environment is clean, because the service is initialized by name and the
Docker only allows a single name by container. See the instructions
ExecStartPre, they have an =- in its syntax, this indicates that if
these routines fails they won’t raise an error and the script will
continues to run, if there is a container with the name nginx these
tasks will be successful. In the last two instructions are executed the
pull of the image used, and the run to the creation of the container.
Finally, we want our service to run only on machines that do not have a
Nginx service, for this we use a section called [X-Fleet] where you
can store about the Fleet behavior, in this case we are entering a
restriction and ensuring that it will run only one Nginx service per
node in the entire cluster. This setting is interesting in larger clusters.
Etcd and Fleet
We need to record the current statuses of the services initialized in
the cluster, for this we will create another service file
nginx-discovery@.service. This new file is very similar to the
previous one, its only responsibility will be in tracking Etcd
updates, reporting the server availability:
[Unit]
Description=Announce Nginx@%i service
BindsTo=nginx@%i.service

[Service]
EnvironmentFile=/etc/environment
ExecStart=/bin/sh -c "while true; do etcdctl set /announce/services/nginx%i ${COREOS_PUBLIC_IPV4}:%i --ttl 60; sleep 45; done"
ExecStop=/usr/bin/etcdctl rm /announce/services/nginx%i

[X-Fleet]
X-ConditionMachineOf=nginx@%i.service
The clausule BindsTo is a dependency to monitor the service’s status
and capture its information. If the listed service is interrupted our
monitoring service will also stop, but we’re changing that and if the
web service fails unexpectedly, the information in Etcd will be
updated. The ExecStart section keeps the information updated through
running the etcdctl command, which is responsible for changing the
values in Etcd being stored in /announce/services/nginx%i.
Finally, in the last statement we are ensuring that this service is
started on the same machine where the web server is running. Now that we
have models for the two services, we can send them to the cluster using
the fleetctl command:
$ fleetctl submit nginx@.service nginx-discovery@.service
After sending these files we can verify that both services are now available for the cluster:
$ fleetctl list-unit-files

UNIT                      HASH     DSTATE     STATE     TARGET
nginx-discovery@.service  9531802  inactive   inactive  -
nginx@.service            1e67818  inactive   inactive  -
Now that the models are available at system statementartup for the
entire cluster, we need to load them by specifying the new name for each
service and the port 80 that indicates our web server which port to use:
$ fleetctl load nginx@80.service
$ fleetctl load nginx-discovery@80.service
We can check which nodes of the cluster this service was loaded:
$ fleetctl list-unit-files

UNIT                        HASH      DSTATE     STATE      TARGET
nginx-discovery@.service    9531802   inactive   inactive   -
nginx-discovery@80.service  9531802   loaded     loaded     97cd08e8.../172.31.46.2
nginx@.service              1e67818   inactive   inactive   -
nginx@80.service            1e67818   launched   launched   97cd08e8.../172.31.46.2
As we can see, the services were loaded in the cluster machines. We can finally start to work:
$ fleetctl start nginx@80.service
To quickly check if the web server has been initialized and is operating normally, we can make requests to public ip of each cluster node:
$ http -h 54.174.248.174
HTTP/1.1 200 OK
Accept-Ranges: bytes
Connection: keep-alive
Content-Length: 612
Content-Type: text/html
Date: Fri, 23 Jan 2015 01:32:54 GMT
ETag: "5418459b-264"
Last-Modified: Tue, 16 Sep 2014 14:13:47 GMT
Server: nginx/1.6.2

$ http -h 54.174.226.238
HTTP/1.1 200 OK
Accept-Ranges: bytes
Connection: keep-alive
Content-Length: 612
Content-Type: text/html
Date: Fri, 23 Jan 2015 01:33:08 GMT
ETag: "5418459b-264"
Last-Modified: Tue, 16 Sep 2014 14:13:47 GMT
Server: nginx/1.6.2
Conclusion
Managing Docker containers in CoreOS is not as complicated as it seems, and distributing the containers in a cluster is a very interesting task, it takes a little time to familiarize yourself with the news of Docker, CoreOS, Fleet and Etcd. I will continue to explore them in other posts.
Happy Hacking ;)